

导入 MCP 客户端配置
本演练导入为某个编程助手配置的 Model Context Protocol 服务器——其中两个由它从命令行启动,一个由他人运行——并为 Kubernetes 构建这些服务器,使在集群中运行的代理也能使用相同的工具。导入会起草构建所读取的每个文件:每个服务器的命令行或地址、运行它的实现,以及 GitHub 服务器令牌的来源。下面的每个文件和每段输出都来自一次真实运行;配置和演练的每个阶段都位于 import-mcp 示例中,其中的检查脚本会再次运行导入,将它写出的内容、打印的内容以及本页引用的代码块与那里保存的文件进行比较,并验证和构建导入写出的内容。
生成示例
你可以使用本页的命令运行此导入,也可以让你的 AI 助手替你运行。
将示例写入一个以其命名的新文件夹:
aggrega scaffold --example import-mcp然后它会打印接下来要运行的命令。第一条命令进入新文件夹;其后的那条命令见下文,它进入新文件夹的 source 文件夹,该文件夹包含本页导入的内容,也是运行导入的位置:
cd import-mcp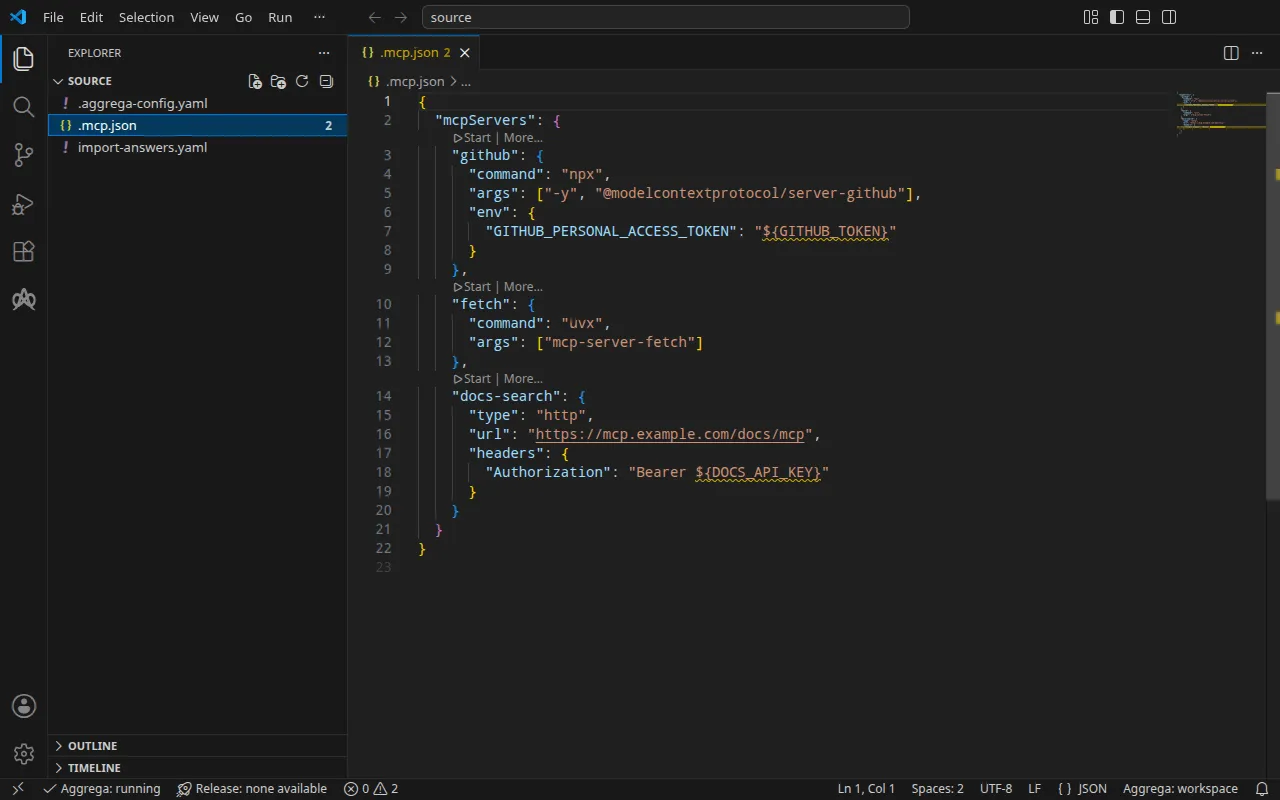
配置
位于项目根目录中的 Claude Code 的 .mcp.json:
{ "mcpServers": { "github": { "command": "npx", "args": ["-y", "@modelcontextprotocol/server-github"], "env": { "GITHUB_PERSONAL_ACCESS_TOKEN": "${GITHUB_TOKEN}" } }, "fetch": { "command": "uvx", "args": ["mcp-server-fetch"] }, "docs-search": { "type": "http", "url": "https://mcp.example.com/docs/mcp", "headers": { "Authorization": "Bearer ${DOCS_API_KEY}" } } }}导入以相同方式读取 Claude Desktop 的 claude_desktop_config.json、Cursor 的 .cursor/mcp.json、Visual Studio Code 的 .vscode/mcp.json 以及 MCP 注册表的 server.json。在配置旁边,一个 .aggrega-config.yaml 使该文件夹成为工作区:
# The workspace key marks this directory as the workspace root, so an import run# here writes its drafts beside .mcp.json.workspace: {}# The registry the importer is fetched from the first time an import needs it.default_registry: hub.aggrega.ai--target 会根据目录的 Recipes 起草一个 Manifest。工作区没有指定目录文件夹,因此导入会从获取其导入器的注册表中读取标准库目录:这是已发布目录的一个签名快照,由第一次导入获取、验证并保存在工作区的内容缓存中,并在导入写在其草稿旁的记录中以其摘要标明。指定了自己的目录文件夹的工作区——在 AGGREGA_CATALOG_DIRS 中,或在 workspace.catalog_dirs 下——则改为针对这些文件夹进行导入。
答案文件
在 Kubernetes 上,GitHub 服务器从集群持有的一个 Secret 中读取其令牌,而没有任何 MCP 配置指明该 Secret:配置从你的 shell 的 GITHUB_TOKEN 中读取令牌。因此导入会询问该 Secret 的名称。示例将答案保存在 import-answers.yaml 中,位于 .mcp.json 旁边,也就是导入查找它的位置:
# Values the import could not draft from the source, keyed by the drafted file and the key path inside# it. Write each one beside its key; an import of the same source, and a sync, read them from here and# ask nothing. A secret is never written here: its key asks where the secret comes from — a variable# name, ${NAME}, or the name of a Kubernetes Secret.release.yaml: # The origin of the secret value, written by the operator in the Release. Read exactly as # values.origin is. Write it here or in values.origin, never in both. A secret: name where it comes # from, never the value. spec.components.github.features.server_env.infra.origin: "github-mcp-token"导入在第一次未提供答案运行时自行写入了该文件:由于没有可供提问的终端,它起草了其余所有内容,将 Secret 的名称留空,在文件中列出该键,并以下列消息停止
1 value the drafts leave empty is still owed, listed in the answers file <workspace>/import-answers.yaml: write it beside its key there, then run the import again在终端中,它会改为提出该问题,并将答案写入文件以供下一次导入使用。答案是 Secret 的名称 github-mcp-token,绝不是令牌本身。导入答案文件完整描述了该文件及其中的问题。
aggrega import 列出了该命令接受的每个标志,其中包括 --answers,它指定保存在其他位置的应答文件。
进入 source:
cd source运行导入
aggrega import .mcp.json --target helm它在标准输出上列出所写的内容:
wrote aggregate.yamlwrote release.yamlwrote manifest.yamlwrote .aggrega-import.json在标准错误上,其中 <workspace> 代表你运行它的文件夹:
[… omitted: a warning that the importer runs unverified, printed where its module is read from beside its Plugin entity in a catalog folder rather than fetched]read as the mcp format, with drafted paths relative to <workspace>warn: the value of infra.stdio_command.0 of node github is carried as written in the Release the draft writes: the field belongs to an MCP server's configuration, which can carry a key, and setting empty_credentials to marked or all writes it emptywarn: the value of infra.stdio_command.1 of node github is carried as written in the Release the draft writes: the field belongs to an MCP server's configuration, which can carry a key, and setting empty_credentials to marked or all writes it emptywarn: the value of infra.stdio_command.2 of node github is carried as written in the Release the draft writes: the field belongs to an MCP server's configuration, which can carry a key, and setting empty_credentials to marked or all writes it emptywarn: the value of infra.stdio_command.0 of node fetch is carried as written in the Release the draft writes: the field belongs to an MCP server's configuration, which can carry a key, and setting empty_credentials to marked or all writes it emptywarn: the value of infra.stdio_command.1 of node fetch is carried as written in the Release the draft writes: the field belongs to an MCP server's configuration, which can carry a key, and setting empty_credentials to marked or all writes it emptywarn: the value of headers.Authorization of node docs-search is carried as written in the Release the draft writes: the field belongs to an MCP server's configuration, which can carry a key, and setting empty_credentials to marked or all writes it emptywarn: the value of infra.endpoint of node docs-search is carried as written in the Release the draft writes: the field belongs to an MCP server's configuration, which can carry a key, and setting empty_credentials to marked or all writes it emptyPull complete: <workspace>/release.lock (entities=7, source_artifacts=0, external_inputs=0)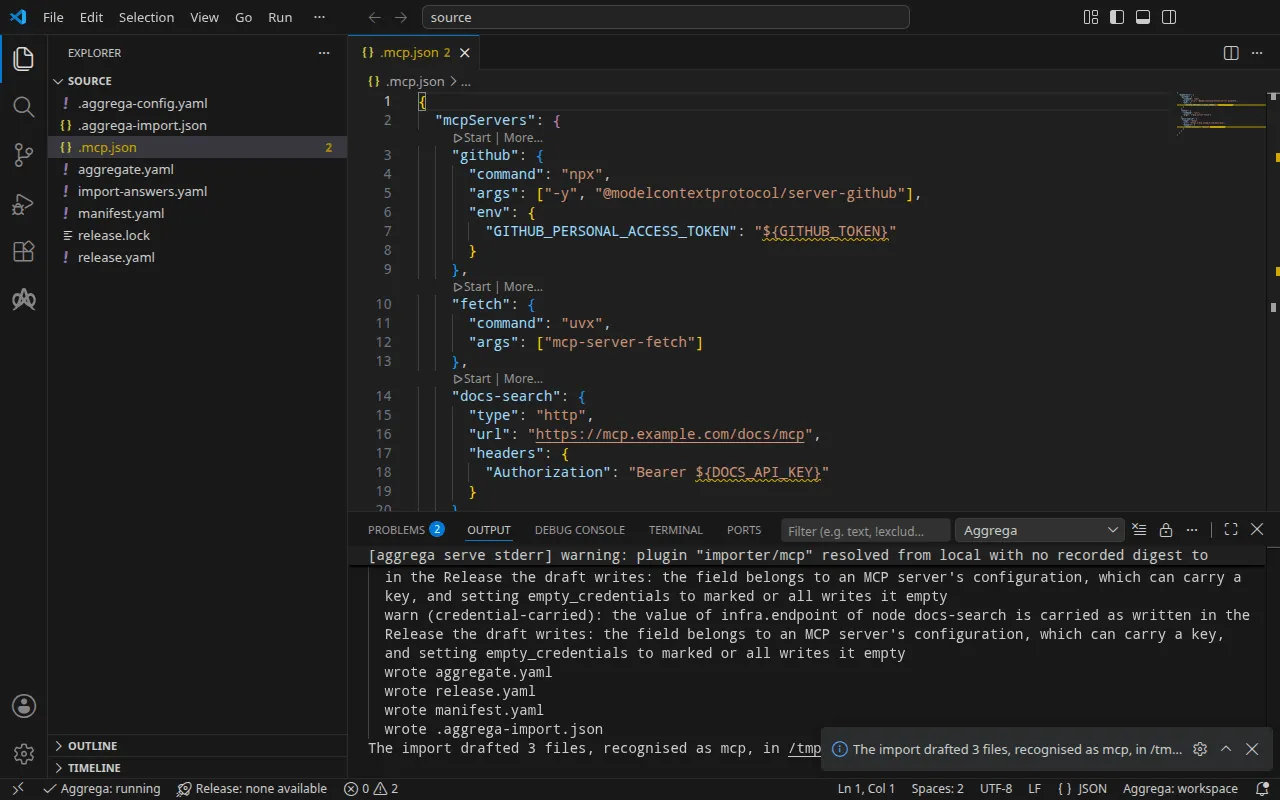
每个服务器都是标准库 MCP 工具 core/ai-tool/mcp 的一个实例,因此导入不权衡任何候选项,也不打印 mapped 行。
warn行指出服务器配置中保存的值。没有任何 MCP 客户端将其中任何一个标记为凭据,而其中任何一个都可能携带凭据——命令行参数中的密钥、地址中的令牌——因此导入会按服务器和位置(而绝不按值)指出它所携带的命令行的每一项、每个标头和每个地址。在分享草稿之前请先阅读它们。env值${GITHUB_TOKEN}只是一个变量引用,因此它本身不保存任何值,也没有警告提到它。Pull complete这一行表示导入正在像aggrega pull那样,将草拟的 Release 所依赖的内容获取到release.lock中,使草稿可以立即通过验证并构建。在--offline下,导入不拉取任何内容,并给出需要运行的aggrega pull。
它写出的内容
该 Aggregate、Release 和 Manifest 命名为 imported/mcp,取自文件名 .mcp.json,因为客户端的配置不带自己的名称——注册表的 server.json 按其 name 命名——位于导入器的 target_namespace 设置所设定的命名空间下,除非你另行设置,否则该命名空间为 imported(设置)。
aggregate.yaml——每个服务器一个实例,目前还没有任何东西使用它们:
apiVersion: aggrega.ai/v1beta1kind: Aggregatemetadata: name: imported/mcp version: 0.1.0 description: Draft Aggregate imported from a source in the mcp format.spec: components: github: type: core/ai-tool/mcp fetch: type: core/ai-tool/mcp docs-search: type: core/ai-tool/mcprelease.yaml——按配置所述,每个服务器如何运行或如何访问,以及读取 GitHub 服务器令牌所用的 Secret:
apiVersion: aggrega.ai/v1beta1kind: Releasemetadata: name: imported/mcp # environment is a drafted default, since no source names the environment this Release deploys to; change it to name the one it deploys to. environment: development version: 0.1.0 description: Draft Release imported from a source in the mcp format.spec: aggregate: imported/mcp manifest: imported/mcp components: github: infra: stdio_command: - "npx" - "-y" - "@modelcontextprotocol/server-github" stdio_runtime: npm features: server_env: type: core/referenced-secret infra: # Left for the Release, since the source cannot supply it: the name of a Kubernetes Secret already in the namespace holding the environment github is started with, one data key per variable, each named as the variable it holds: GITHUB_PERSONAL_ACCESS_TOKEN. origin: "github-mcp-token" fetch: infra: stdio_command: - "uvx" - "mcp-server-fetch" stdio_runtime: pypi # The headers the source sends this server, which no infrastructure key of core/ai-tool/mcp takes, since a remote server's credential is held by each consumer, on its connection to the tool: # - Authorization: "Bearer ${DOCS_API_KEY}" docs-search: infra: endpoint: "https://mcp.example.com/docs/mcp"- 环境
development是导入写入的默认值,因为没有任何配置指定环境;如果 Release 部署到其他地方,请修改它。 stdio_runtime从每条命令中读出:npx运行 npm 软件包,uvx运行 PyPI 软件包。- GitHub 令牌。服务器的环境变为它的
server_env槽。在 Kubernetes 上,core/referenced-secret-set的实现helm/k8s-secret-set会将给定的值写入构建渲染出的 Secret 中,这会把令牌放进文件里。因此,对于--target helm,导入改为附加core/referenced-secret,指定集群中已有的一个 Secret——即答案github-mcp-token——每个变量对应一个数据键GITHUB_PERSONAL_ACCESS_TOKEN。桥接器会把该 Secret 的每个数据键导入为同名变量,因此服务器像在你的机器上一样读取其令牌,且没有任何渲染出的文件携带它。 Authorization标头保留为注释。远程服务器的凭据由调用它的一方持有,位于该调用方自己到该工具的连接上,而此工作区还没有调用方。当你将某个代理连接到docs-search时,该标头应放在那条连接上。
manifest.yaml——每个服务器按名称对应一个实现,外加该 Secret 的实现:
apiVersion: aggrega.ai/v1beta1kind: Manifestmetadata: name: imported/mcp version: 0.1.0spec: mappings: components: type: {} name: github: helm/mcp-stdio-bridge fetch: helm/mcp-stdio-bridge docs-search: helm/mcp-remote features: type: core/referenced-secret: helm/k8s-existing-secret三个 Kubernetes Recipes 实现 core/ai-tool/mcp——一个用于以镜像形式发布的服务器,一个用于在桥接器后运行的软件包,一个用于由他人运行的服务器——哪一个适用是每个服务器自身的属性,由配置说明。因此,导入按名称映射每个实例:从命令行启动的 github 和 fetch 在 stdio 桥接器 helm/mcp-stdio-bridge 后运行;由他人运行的 docs-search 映射到 helm/mcp-remote,后者不运行任何东西,只发布地址。令牌的 Secret 映射到 helm/k8s-existing-secret,它引用一个 Secret,而不是写出一个。
release.lock 按摘要记录该 Release 解析到的目录实体,.aggrega-import.json 则是导入所写内容的记录,之后的 aggrega import --sync 会读取它。
在 Docker Compose 上
这些服务器也可以在 Docker Compose 上运行。aggrega import .mcp.json --target compose 将 github 和 fetch 映射到 compose/mcp-stdio-bridge,将 docs-search 映射到 compose/mcp-remote,并按配置所写保留 GitHub 服务器的环境:一个 core/referenced-secret-set 条目,其值为变量引用 ${GITHUB_TOKEN},由 compose/dotenv-secret-set 实现,它将该引用按原样写入服务的环境,这样 Docker Compose 会在栈启动时从你的 shell 中填充它。该导入不询问任何内容,并在答案文件中保留该 Secret 的名称而不使用它。
验证并构建
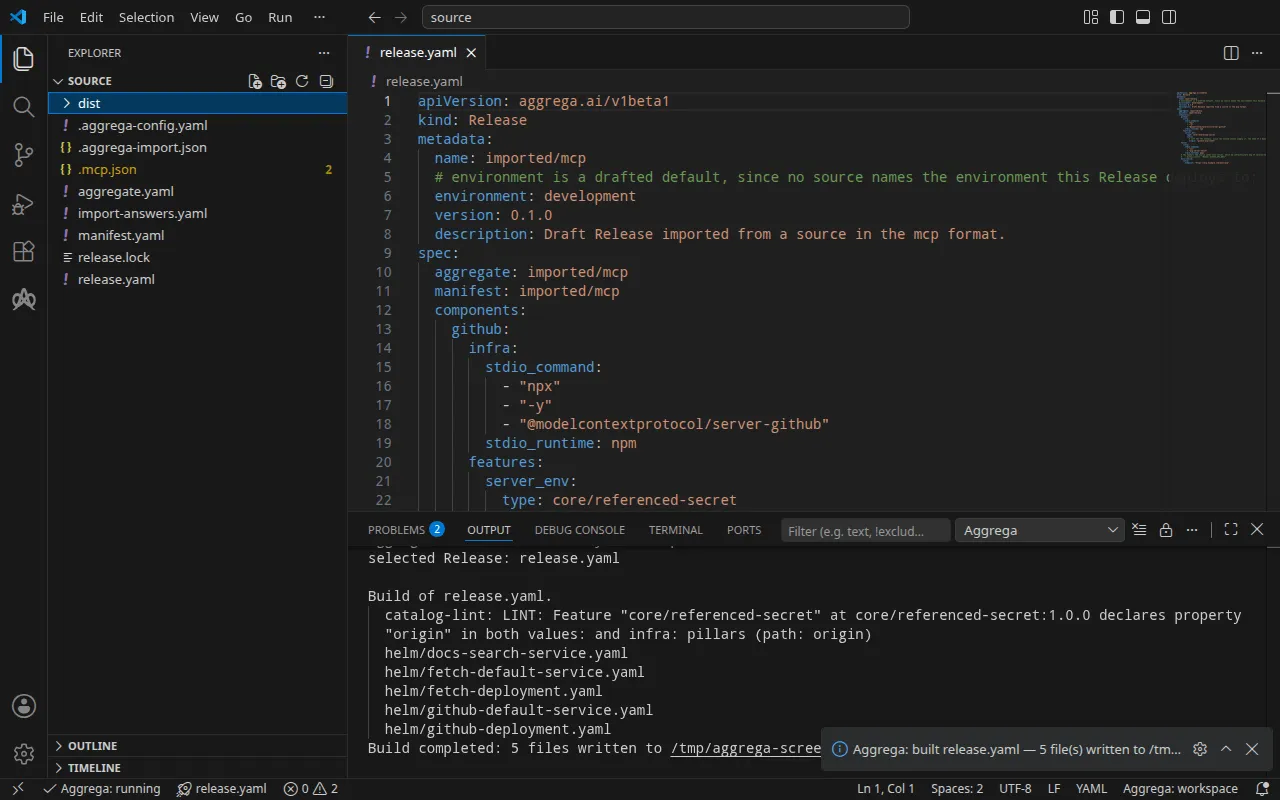
aggrega validate --release release.yamlaggrega build --release release.yaml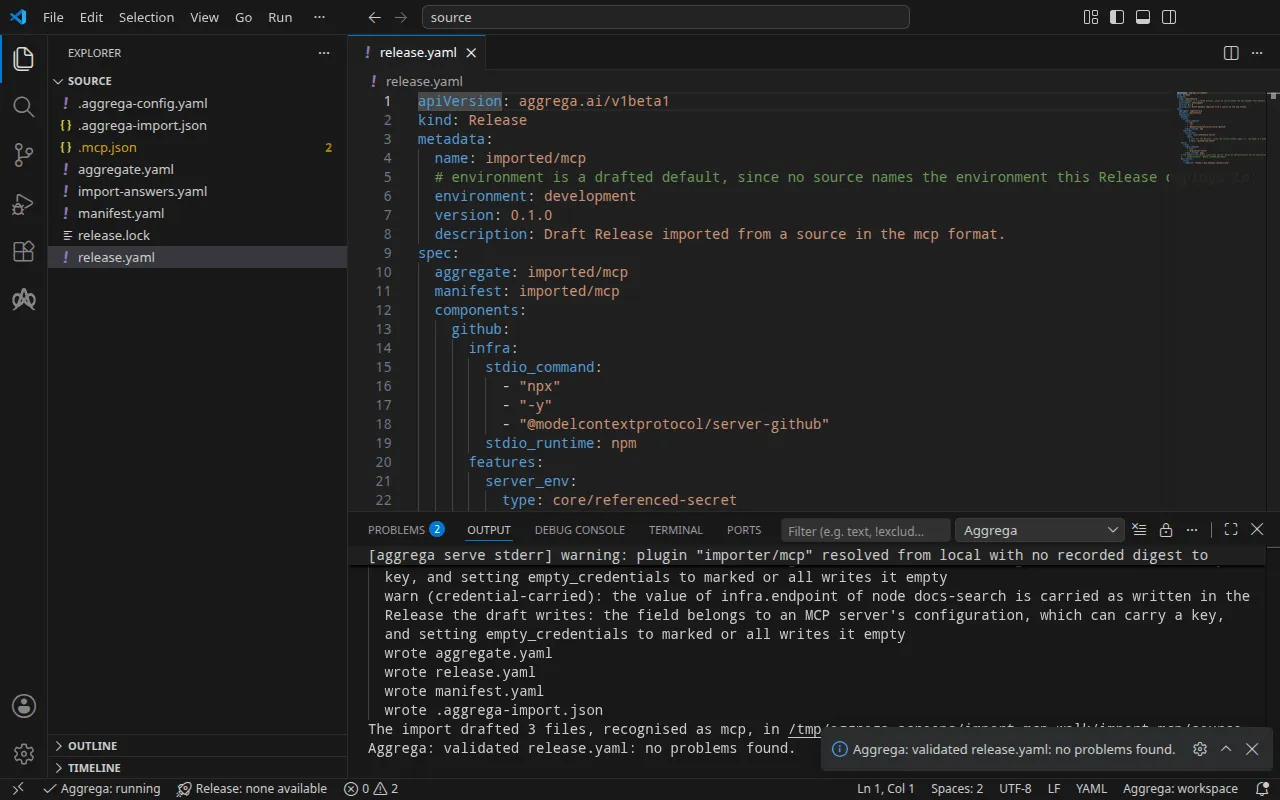
验证打印:
notice: LINT: Feature "core/referenced-secret" at core/referenced-secret:1.0.0 declares property "origin" in both values: and infra: pillars (path: origin)release dependency validation passed: release.yaml (schema-pillar + dependency pillars)以及构建,其中 <workspace> 代表你运行它的文件夹:
notice: LINT: Feature "core/referenced-secret" at core/referenced-secret:1.0.0 declares property "origin" in both values: and infra: pillars (path: origin)[… omitted: a total build time, which differs per run]Build completed: 5 files written to <workspace>/distnotice 行仅为提示:该 Feature 接受来自 Aggregate 的 values 或 Release 的 infra 的 origin,而该提示报告有一个叶子在两处都有声明。它不改变任何结论。
构建在 dist/helm/ 下为两个经桥接的服务器各写出一个 Deployment 和一个 Service,并为 docs-search 写出一个 Service。GitHub 服务器的容器(位于 dist/helm/github-deployment.yaml 中)以该服务器的命令行运行桥接器,并从 Secret 获取其环境:
containers: - name: main image: ghcr.io/supercorp-ai/supergateway:4.1.0@sha256:1938c43538a5308bce07d58028e9de00b7acfecb40b39b059b2f3931800ad910 args: - --stdio - '''npx'' ''-y'' ''@modelcontextprotocol/server-github''' - --outputTransport - streamableHttp - --stateful - --port - "8080" - --streamableHttpPath - /mcp - --healthEndpoint - /healthz ports: - name: http containerPort: 8080 env: - name: MCP_TOOL_SIDE_EFFECTS value: mutating - name: MCP_TOOL_TIMEOUT_SECONDS value: "30" - name: MCP_TOOL_PORT value: "8080" envFrom: - secretRef: name: github-mcp-token [… omitted: the container's resources and its readiness probe]dist/helm/docs-search-service.yaml 不运行任何东西:它为由他人运行的服务器在集群内提供一个名称。
apiVersion: v1kind: Servicemetadata: name: docs-search [… omitted: the labels and annotations the build writes on every resource]spec: type: ExternalName externalName: mcp.example.com ports: - port: 443借助 AI 助手
配置了 Aggrega 工具的 AI 助手也可以完成同样的操作:将下面的提示词粘贴给它。
只使用 Aggrega 工具,不要自己创建任何文件夹。如果工作区文件夹中还没有 `import-mcp` 文件夹,调用一次 `scaffold` 工具,将 `example` 设为 `import-mcp`,不设 `dir`:它会将示例写入新的 `import-mcp` 文件夹,其中的 `source` 文件夹包含本页导入的内容。然后调用 `import` 工具,将 `workspace_root` 设为 `import-mcp/source`,`source` 设为 `.mcp.json`,`target` 设为 `helm`:它从 `.mcp.json` 旁边的 `import-answers.yaml` 读取所需的答案,将草稿写入 `import-mcp/source`,并拉取它们所需的内容。然后调用 `validate` 工具,将 `workspace_root` 设为 `import-mcp/source`,`release` 设为 `release.yaml`;再调用 `build` 工具,将 `workspace_root` 设为 `import-mcp/source`,`release` 设为 `release.yaml`,`write` 设为 true。告诉我构建写入了哪些文件;它们位于 `import-mcp/source/dist/` 下。在 VS Code 中打开
安装 适用于 Visual Studio Code 的 Aggrega 扩展 后,在 VS Code 中打开导入写入草稿的文件夹 import-mcp/source。该文件夹包含一个 Release,即起草的 release.yaml,因此编辑器会为你选中它,并在你编辑草稿时对照该 Release 检查草稿,将发现的问题标记在文件中和“问题”面板中。命令面板中的 Aggrega: Show topology graph 会绘制 Release 的组件及其之间的连接。Aggrega: Build、Aggrega: Preview build 和 Aggrega: Pull 作用于同一个 Release,并且每一个也是活动栏中 Aggrega 视图的 Commands 面板上的按钮;Build 会将其文件写入该文件夹的 dist/。在 Visual Studio Code 中使用 Aggrega 介绍了其余内容。
运行
构建中没有任何内容写入 github-mcp-token Secret,因此请在应用这些文件之前创建它。将你的令牌写入 github-token.env,作为唯一的一行 GITHUB_PERSONAL_ACCESS_TOKEN=<your token>,并从该文件创建 Secret。此后集群会保存该令牌,因此请删除该文件:
kubectl create secret generic github-mcp-token --from-env-file=github-token.envrm github-token.envsecret/github-mcp-token created按照 导入如何运行 中运行步骤的说明应用构建结果,并等待两个服务器:
kubectl apply -R -f dist/helm/kubectl wait --for=condition=Available deployment.apps/fetch deployment.apps/github --timeout=5mservice/docs-search createdservice/fetch-default createddeployment.apps/fetch createdservice/github-default createddeployment.apps/github createddeployment.apps/fetch condition metdeployment.apps/github condition met在 Docker Compose 上,在使用 --target compose 导入并构建的工作区中,将你的令牌放在 shell 的 GITHUB_TOKEN 中启动栈,Docker Compose 会在栈启动时读取它:
docker compose -p mcp -f dist/compose/docker-compose.yaml up -d --wait测试
桥接器通过 MCP 的 Streamable HTTP 传输在端口 8080 上的 /mcp 提供每个服务器。使用 MCP 的 initialize 请求让 fetch 服务器打开一个会话,该请求不读取任何令牌。
在 Docker Compose 上,从栈网络 mcp_compose 上的一个临时容器发送该请求,在该网络中服务器的名称是 fetch:
docker run --rm --network mcp_compose curlimages/curl:8.11.1 -sS http://fetch:8080/mcp \ -H 'Content-Type: application/json' -H 'Accept: application/json, text/event-stream' \ -d '{"jsonrpc": "2.0", "id": 1, "method": "initialize", "params": {"protocolVersion": "2025-06-18", "capabilities": {}, "clientInfo": {"name": "test-it", "version": "1.0.0"}}}': keepalive
[… omitted: the same comment, repeated while the server starts]
event: messagedata: {"jsonrpc":"2.0","id":1,"result":{"capabilities":{"prompts":{"listChanged":false},"resources":{"listChanged":false,"subscribe":false},"tools":{"listChanged":false}},"protocolVersion":"2025-06-18","serverInfo":{"name":"mcp-fetch","version":"2026.11.11"}}}在 Kubernetes 上,将一个本地端口转发到服务器的 Service fetch-default,并让该命令保持运行:
kubectl port-forward svc/fetch-default 8080:8080在另一个终端中,向转发的端口发送同样的请求:
curl -sS http://127.0.0.1:8080/mcp \ -H 'Content-Type: application/json' -H 'Accept: application/json, text/event-stream' \ -d '{"jsonrpc": "2.0", "id": 1, "method": "initialize", "params": {"protocolVersion": "2025-06-18", "capabilities": {}, "clientInfo": {"name": "test-it", "version": "1.0.0"}}}': keepalive
: keepalive
event: messagedata: {"jsonrpc":"2.0","id":1,"result":{"capabilities":{"prompts":{"listChanged":false},"resources":{"listChanged":false,"subscribe":false},"tools":{"listChanged":false}},"protocolVersion":"2025-06-18","serverInfo":{"name":"mcp-fetch","version":"2026.11.11"}}}回复中给出服务器的名称 mcp-fetch。这需要一些时间:桥接器为每个会话启动服务器的命令行 uvx mcp-server-fetch,而 uvx 会先下载并安装服务器的软件包——在本次运行中,Kubernetes 上大约半分钟,Docker Compose 上大约一分钟。: keepalive 行是流在此期间发送的注释。
GitHub 服务器在 Docker Compose 上通过 http://github:8080/mcp 响应同样的请求,在 Kubernetes 上则通过 kubectl port-forward svc/github-default 8080:8080 响应。initialize 不读取任何令牌,因此无论令牌内容如何它都会响应;本次运行使用的是占位令牌:
[… omitted: the keepalive comments, sent while npx installs the server]event: messagedata: {"result":{"protocolVersion":"2024-11-05","capabilities":{"tools":{}},"serverInfo":{"name":"github-mcp-server","version":"0.6.2"}},"jsonrpc":"2.0","id":1}停止端口转发,然后删除你所应用的内容以及该 Secret:
kubectl delete -R -f dist/helm/kubectl delete secret github-mcp-token在 Docker Compose 上,停止并删除栈:
docker compose -p mcp -f dist/compose/docker-compose.yaml down